Step 1. Designing Patterns(Gara no Sekkei)
Patterns and colors are decided on. After design-images are drawn on paper, the designs are carefully copied onto plotting papers.
Step2. Reeling(Itokuri)
This step is where thread is prepared. Silk thread is boiled in hot water, then dried well. This boiled and dried silk thread is called Kase-ito. The Kase-ito is then reeled.
Step 3. Warping(Haebata)
This is preparation of the length and number of warps and woofs for each Oshima Tsumugi textile. The length and width of each Oshima Tsumugi textile must be not less than 12.32 meters and 34.8 centimeters respectively. Mistakes at this stage will prevent the textile from being approved as Oshima Tsumugi.
Step 4. Using adhesive on warps and woofs(Norihari)
In order to create patterns, first the warps and then the woofs of Haebata must be stuck together with adhesive. Natural products, such a special type of sea-weed, are used to make the adhesive. Attached-together warps and attached-together woofs are dried under the sun, then left inside for about ten days to be dried naturally and to stop them from shrinking any further. There is no written information about how thick the adhesive should be, or about how tight the warps and woofs should be. Both depend on the weather, the force of the wind, the level of humidity and other natural elements. The process requires long experience and understanding of the techniques involved.
Step 5. Binding the warps and woofs(Shimebata)
One of the characteristics of Oshima Tsumugi is the fine and beautiful design of its patterns. And one of the secrets of the fine patterns is the technique of Shimebata. Using cotton threads, the silk thread is bound together hard to make a kind of cloth called Mushiro. The level of tightness is very important, and physical strength is necessary to achieve this tightness. Therefore, traditionally, only men have undertaken this process. Again, only long experience and understanding of the techniques involved can produce the correct level of tightness.
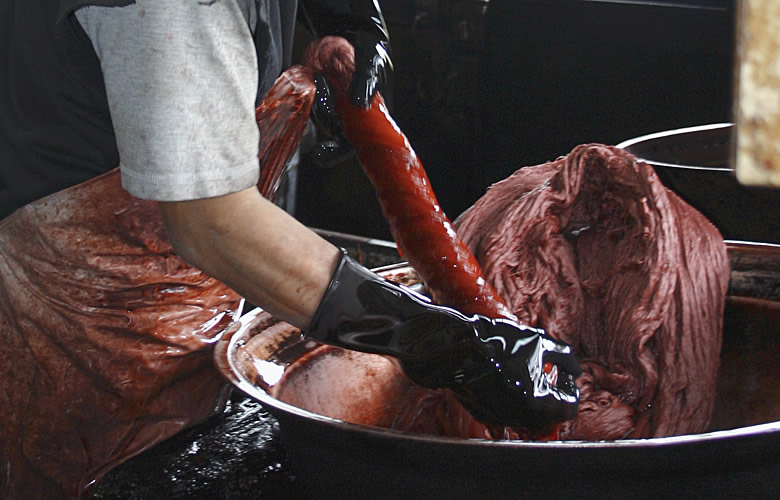
Step 6. Dyeing with fluid extracts taken from the yeddo hawthorn(Teichigizome)
There are two important processes in dyeing. One is to dye the Mushiro with fluid extracts taken from the yeddo hawthorn. Finely cut yeddo hawthorn is boiled in a big pot for ten to twelve hours. The warps, woofs and homespun thread (called Jiito) are rubbed in the cooled fluid. This process is repeated from twenty to sixty times. The tannic acid in the yeddo-hawthorn fluid helps dye the thread a light brown color.
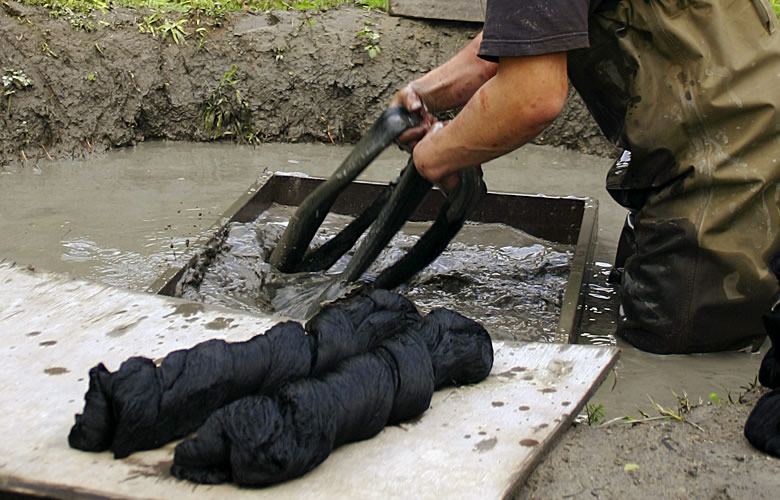
Step 7. Dying with Mud(Dorozome)
The thread dyed with yeddo-hawthorn fluid is rubbed with mud in a field. The mud-field must be especially rich with the right type of mud. Tannic acid from the yeddo-hawthorn fluid extracts and iron in the mud react chemically, and this dyes the thread a black color. Then the thread is washed carefully in clean water. This process of rubbing in mud and washing is repeated three to four times in order to create the dark color which is unique to Oshima Tsumugi.
Step 8. Coloring Mushiro(Surikomi Senshoku)
In recent years, chemical dyestuffs have made it possible to color Oshima Tsumugi in various colors. This type of Oshima Tsumugi is called Iro Oshima which means "Colored Oshima Tsumugi". Coloring is done by rubbing the dyestuffs onto Mushiro by hand. First, the parts of Mushiro where dyestuffs are rubbed in must be untightened. Thus these parts will be colored properly. This process is done little by little, and it takes a long time.
Step 9. Undoing Mushiro(Shime wo Toku)
When all dyeing and coloring processes are completed, the cotton threads are removed from Mushiro. The silk thread, now colored, is used for making Oshima Tsumugi.
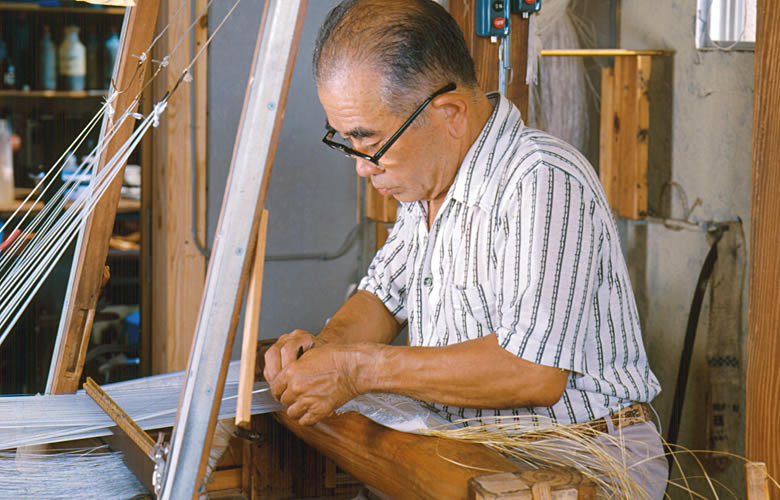
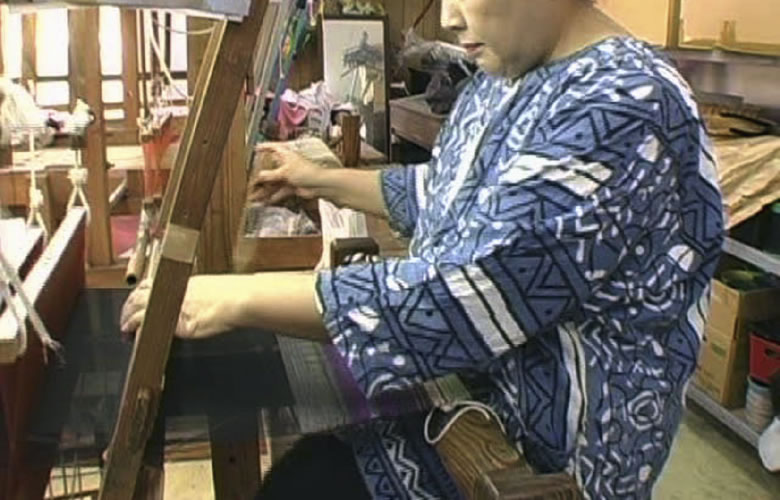
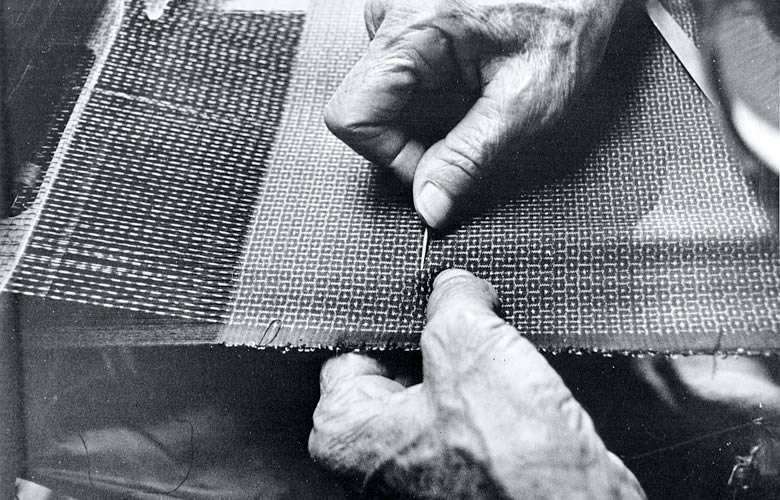
Step 10. Weaving(Hataori)
The type of loom used for weaving Oshima Tsumugi is called Takabata, meaning a tall loom. It is made for hand weaving. Short shuttles are used. After every seven meters of weaving, the warps are loosened slightly and an adjustment of the patterns is made, using a long needle. This process is repeated until the weaving is completed. It takes about forty days to weave a textile that is long enough to make a Kimono.
Step 11. Check-ups(Kensa)
All woven Oshima Tsumugi must be taken to the Oshima Tsumugi Union to be checked. Twenty categories, including length, width, consistency of color and accuracy of patterns, are checked carefully by specialists. The certificate guaranteeing quality and the trademark label are only given to those Oshima Tsumugi which pass all categories.